Understanding CustomPaint, CustomPainter, and the Canvas

In my last post, we talked about a generalized strategy for approaching the Flutter Clock Challenge. In this post, we'll dig into drawing on the canvas using the CustomPaint widget.
CustomPaint and CustomPainter
For all the powerful things you can do with a CustomPaint, its API surface is relatively small. It allows you set a CustomPainter that serves as a background for the widget, an optional child that will draw itself above the painter, and an optional foreground painter to draw in front of the child widget.
CustomPaint(
    painter: ,
    child: , /* optional */
    foregroundPainter: , /* optional */
)
The real power comes from CustomPainter and its use of the canvas. CustomPainter has the following signatures.
class MyClass extends CustomPainter {
   @override void paint(Canvas size, Size size) { /*...*/ }

   @override bool shouldRepaint(CustomPainter oldDelegate) { }
}
Canvas
The Canvas class exposes drawing commands for a number of operations including:
points, lines, arcs/ellipses, and polygonal shapes,
paths,
text,
shadows, and,
clipping.
Most of the operations take the form of draw* and may take an Offset, individual double s, and a Paint to draw the object. One thing to keep an eye on if coming a graphics package in another language is that Offset changes what it means depending on where it is used. Sometimes, it's an delta from another coordinate, other times it represents a position. From the Flutter docs,
Generally speaking, Offsets can be interpreted in two ways:
As representing a point in Cartesian space a specified distance from a separately-maintained origin. For example, the top-left position of children in the RenderBox protocol is typically represented as an Offset from the top left of the parent box.
As a vector that can be applied to coordinates. For example, when painting a RenderObject, the parent is passed an Offset from the screen's origin which it can add to the offsets of its children to find the Offset from the screen's origin to each of the children.
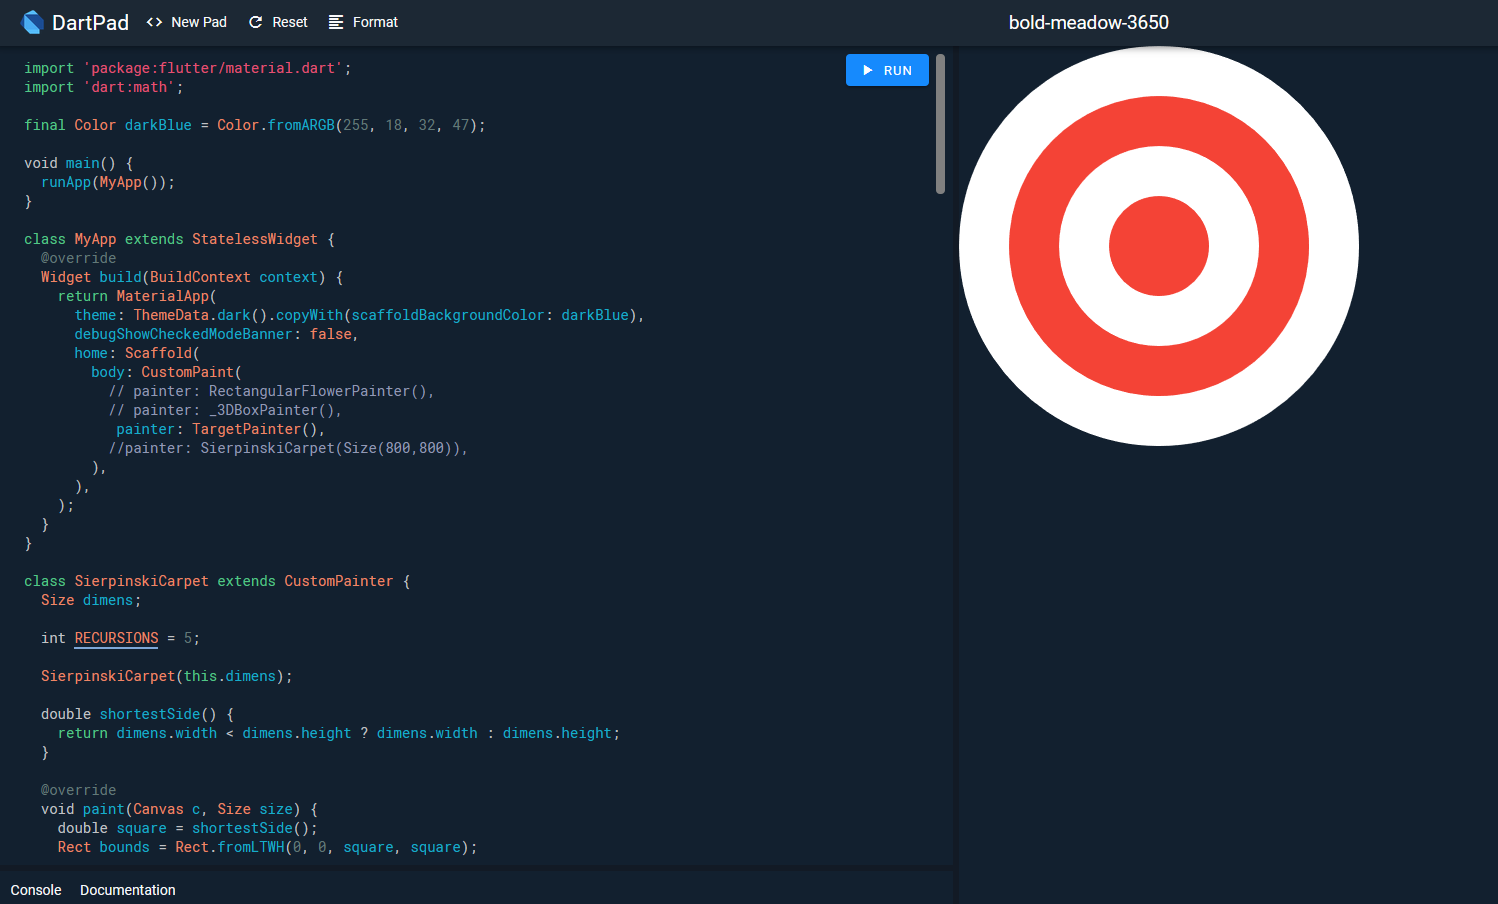
Here's a painter that draws a target on a canvas using circles with alternating colors and decreasing radii. For the paints, I used the built-in Material Colors class. You can alternatively specify a color directly in hex using AARRGGBB format.
class TargetPainter extends CustomPainter {

@override
void paint(Canvas canvas, Size size) {
    // Offset sets each circle's center
    canvas.drawCircle(
        Offset(200,200), 200, Paint()..color = Colors.white);

    canvas.drawCircle(
        Offset(200,200), 150, Paint()..color = Colors.red);

    canvas.drawCircle(
        Offset(200,200), 100, Paint()..color = Colors.white);

    canvas.drawCircle(
        Offset(200,200), 50, Paint()..color = Color(0xFFFF0000);
}

@override
bool shouldRepaint(CustomPainter oldDelegate) => true;

} 
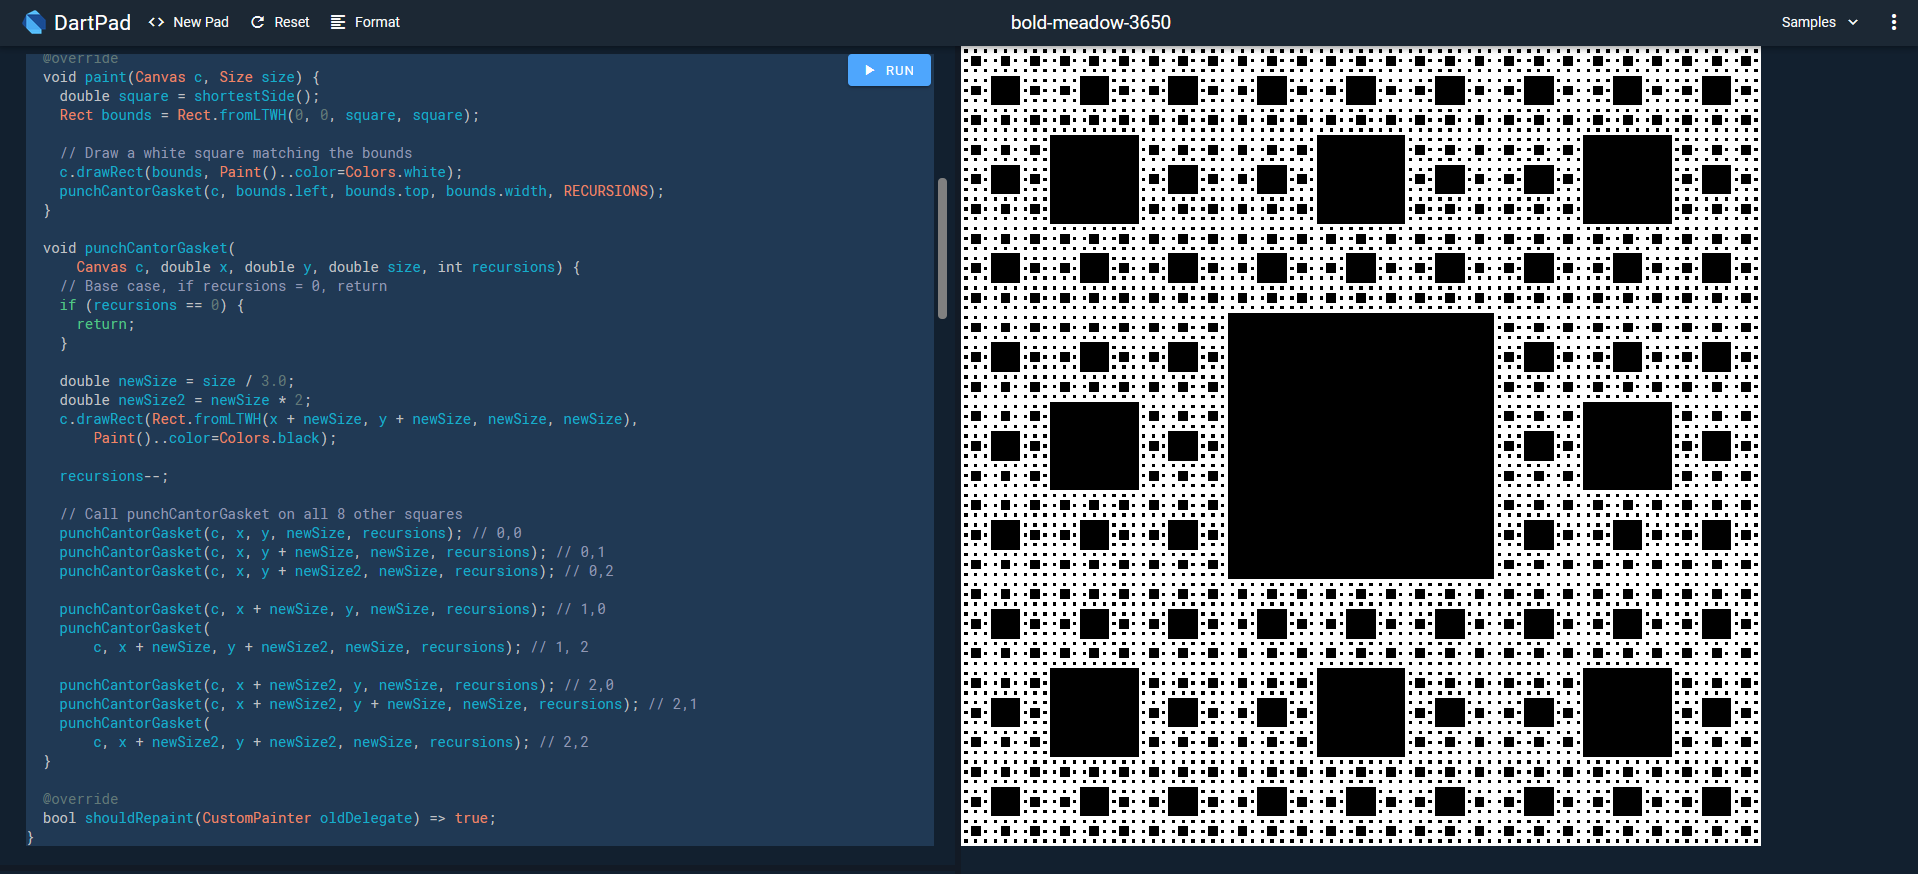
Here's another painter creating a Sierpinksi carpet (shown in article hero image), a plane fractal formed by subdividing the plane into 9 parts, removing the center and then recursively subdividing those parts.
class SierpinskiCarpet extends CustomPainter {
  Size dimens;

  int RECURSIONS = 5;

  SierpinskiCarpet(this.dimens);

  double shortestSide() {
    return dimens.width < dimens.height ? dimens.width : dimens.height;
  }

  @override
  void paint(Canvas c, Size size) {
    double square = shortestSide();
    Rect bounds = Rect.fromLTWH(0, 0, square, square);

    // Draw a white square matching the bounds
    c.drawRect(bounds, Paint()..color=Colors.white);
    punchCantorGasket(c, bounds.left, bounds.top, bounds.width, RECURSIONS);
  }

  void punchCantorGasket(
      Canvas c, double x, double y, double size, int recursions) {
    // Base case, if recursions = 0, return
    if (recursions == 0) {
      return;
    }

    double newSize = size / 3.0;
    double newSize2 = newSize * 2;
    c.drawRect(Rect.fromLTWH(x + newSize, y + newSize, newSize, newSize),
        Paint()..color=Colors.black);

    recursions--;

    /* Call punchCantorGasket on all 8 other squares */
    punchCantorGasket(c, x, y, newSize, recursions);            /* 0,0 */
    punchCantorGasket(c, x, y + newSize, newSize, recursions);  /* 0,1 */
    punchCantorGasket(c, x, y + newSize2, newSize, recursions); /* 0,2 */

    punchCantorGasket(c, x + newSize, y, newSize, recursions);  /* 1,0 */
    punchCantorGasket(
        c, x + newSize, y + newSize2, newSize, recursions);     /* 1, 2 */

    punchCantorGasket(c, x + newSize2, y, newSize, recursions); /* 2,0 */
    punchCantorGasket(
        c, x + newSize2, y + newSize, newSize, recursions);     /* 2,1 */
    punchCantorGasket(
        c, x + newSize2, y + newSize2, newSize, recursions);    /* 2,2 */
  }

  @override
  bool shouldRepaint(CustomPainter oldDelegate) => true;
}
Transforming objects
Drawing a circle or rectangle where we can directly specify the constraints is fine but what happens when we can't directly set a position, or need to rotate or scale. The short answer is that canvas provides answers to translate, scale, and rotate. The long answer is that the order of your transformations matter. They get boiled down into a transformation matrix(an evil math construct) and individual collections of transforms can be made affect all or parts of a drawing using save and restore.
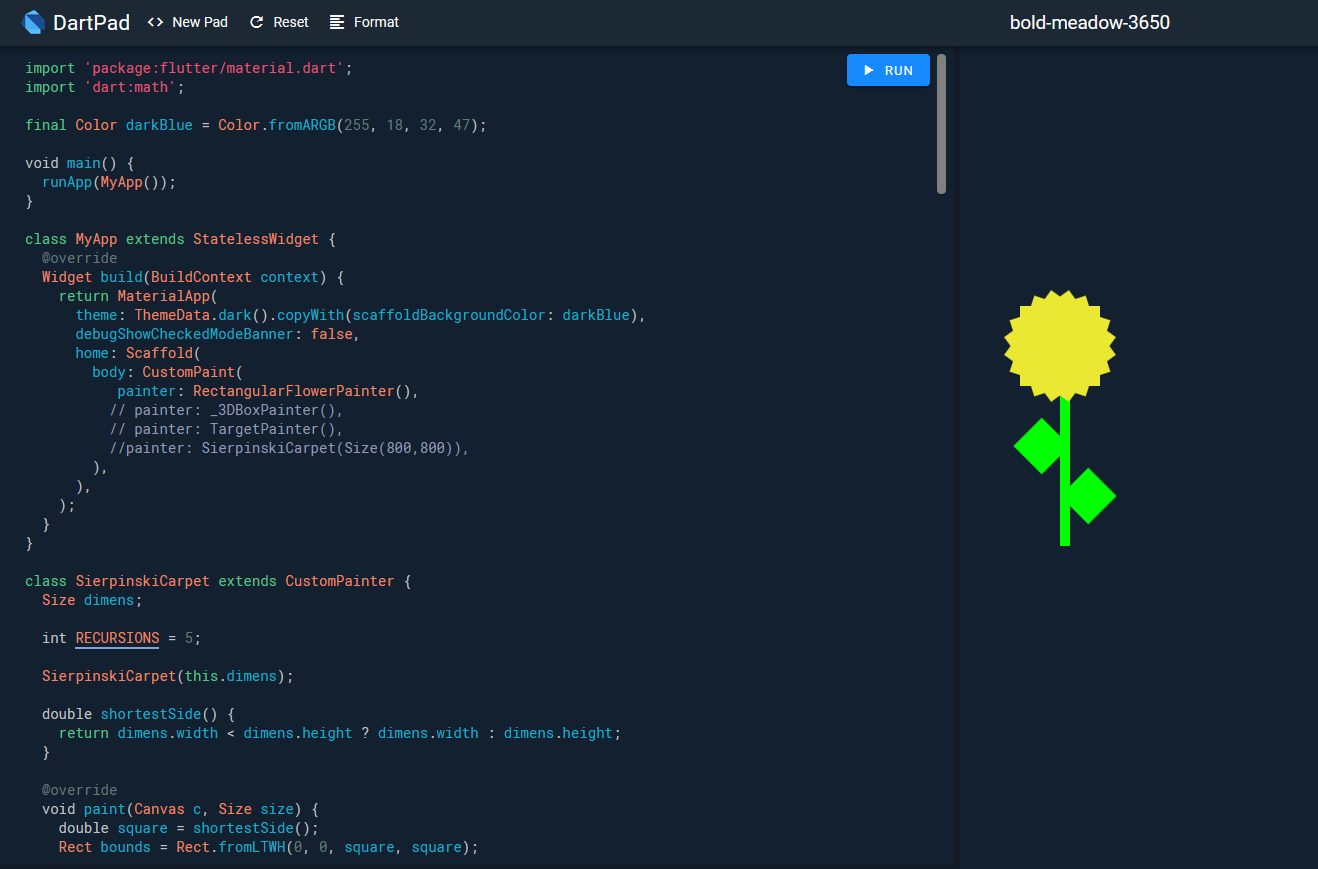
In this snippet of a painter, to draw the leaves of the flower, we save the state of the transform matrix with canvas.save(), do our transforms and drawing and then restore the previous state when done.
The transform matrix works like a Stack. Each new draw instruction looks at the accumulated matrix from the stack, applies it and draws the object. When canvas.restore is called, the previous saved state is popped from the stack. In the case of the flower, the (0,300) translation is done before the first save. So it will affect all the subsequent drawing calls but any transforms enclosed in save/restore will not leak to others.
@override
  void paint(Canvas canvas, Size size) {
    // Draw background
    canvas.drawRect(Rect.fromLTWH(0, 0, size.width, size.height), white_paint);

    canvas.translate(0,300);
    // Draw stem
    Rect stem = Rect.fromLTWH(100, 0, 10, 200);
    canvas.drawRect(stem, green_paint);

    // Draw rotated leaf
    canvas.save();
    canvas.translate(110, 100);
    canvas.rotate(135 * pi / 180);
    Rect leaf1 = Rect.fromLTWH(0, 0, 40, 40);
    canvas.drawRect(leaf1, green_paint);

    canvas.restore();

    // Draw rotated leaf
    canvas.save();
    canvas.translate(100, 150);
    canvas.rotate(315 * pi / 180);

    canvas.drawRect(leaf1, green_paint);
    canvas.restore();

    // Draw petals
    canvas.save();
    canvas.translate(100, 0);
    int petals_count = 20;
    Rect petal = Rect.fromLTWH(0, 0, 40, 40);
    for (int i = 0; i < petals_count; i++) {
      canvas.save();
      canvas.rotate((360.0 * i/petals_count) * pi / 180);
      canvas.drawRect(petal, yellow_paint);
      canvas.restore();
    }

    canvas.restore();
} 
Rendering Paths
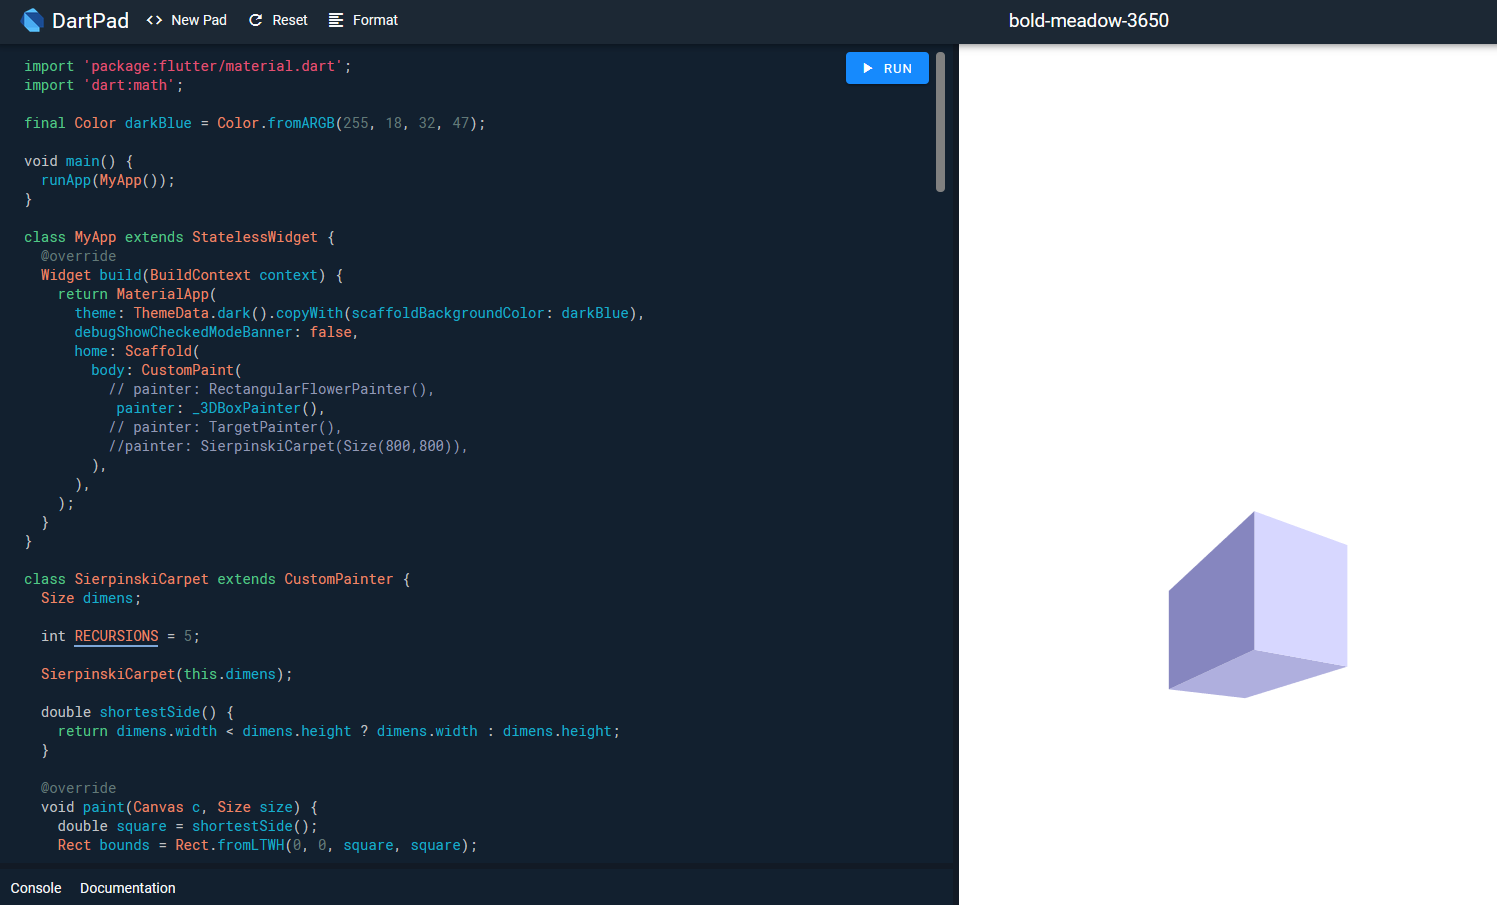
The canvas can also render paths. The following graphic was derived from an Inkscape drawing. Flutter's Path class provides many functions mirroring SVG paths to create complex paths. Given the right calculations, you can simulate 3D like in the following painter.
class _3DBoxPainter extends CustomPainter {
  @override
  void paint(Canvas canvas, Size size) {
    canvas.drawRect(Rect.fromLTWH(0,0,200,200), Paint()..color=Colors.white);

    canvas.scale(5,5);
    Paint side1_paint = Paint()..color = Color(0xFFafafde);
    Path box_side1 = Path();
    box_side1.moveTo(41.961316,129.06088);
    box_side1.relativeLineTo(17.10525,-7.92423);
    box_side1.relativeLineTo(18.609355,3.37377);
    box_side1.relativeLineTo(-20.451153,6.31617);
    box_side1.close();
    canvas.drawPath(box_side1, side1_paint);

    Paint side2_paint = Paint()..color = Color(0xFFd7d7ff);
    Path box_side2 = Path();
    box_side2.moveTo(59.066566,93.428479);
    box_side2.relativeLineTo(0, 27.708171);
    box_side2.relativeLineTo(18.609355,3.37377);
    box_side2.relativeLineTo(0, -24.29189);
    box_side2.close();
    canvas.drawPath(box_side2, side2_paint);

    Paint side3_paint = Paint()..color = Color(0xFF8686bf);
    Path box_side3 = Path();
    box_side3.moveTo(41.961316,109.37679);
    box_side3.relativeLineTo(17.10525,-15.948311);
    box_side3.relativeLineTo(0, 27.708171);
    box_side3.relativeLineTo(-17.10525,7.92423);
    box_side3.close();
    canvas.drawPath(box_side3, side3_paint);

  }
  @override
  bool shouldRepaint(CustomPainter oldDelegate) => true;
} 
This was a relatively quick world wind tour of the capabilities of CustomPaint, CustomPainter, and the Canvas. The upside of Flutter's canvas is that if you are familiar with OpenGL, HTML5 Canvas, or really any low level drawing API, you'll be fine with it. My samples in this post were a mix of ports from an old Udacity course on libGDX (Java game library), adapting an SVG file, and a bespoke example.
The Dartpad holding all the code is here: https://dartpad.dev/b9553214b6cf88410bff2eb5cc89153c