Java3DBuilder take two
As I recently blogged, I've been getting more interested lately in Java3D and have started making a Groovy Java3DBuilder. Existing for as long as I can remember, the OpenGL tutorials at GameDev (http://nehe.gamedev.net) are, IMHO, the true path from journeyman to master in computer graphics. Okay, maybe that sounds a bit too authoritarian. Nonetheless, they have some really good stuff. Those tutorials are what I am using to test the builder modifying and adding things along the way. It is feature-complete for whatever lessons are being covered but might differ in node name or implementation from the original.
The first block of lessons(1-5) center around the basics. In Lesson 02, we draw some colorless geometry. Lesson 03 and 04 add color and rotation while lesson 05 makes the shapes three-dimensional.
Lesson 03
You can thank Andres for the idea for the spiffy looking point nodes. Behind the scenes, the actual values of the attributes controls whether it generates a Point3f, Point2i, etc.
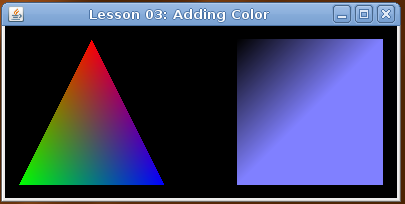
This code builds the above image:
    def su = j3d.simpleUniverse(canvas: canvas3D) {
        branchGroup {
            shape3D {
                triangleArray(numVertices: 3, format: GeometryArray.COORDINATES | GeometryArray.COLOR_3) {
                    vertices {
                        point(x: 0.0f, y: 1.0f, z: 0.0f)
                        point(x: -1.0f, y: -1.0f, z: 0.0f)
                        point(x: 1.0f, y: -1.0f, z: 0.0f)
                    }
                    colors {
                        color(r: 1.0f, g: 0.0f, b: 0.0f)
                        color(r: 0.0f, g: 1.0f, b: 0.0f)
                        color(r: 0.0f, g: 0.0f, b: 1.0f)
                    }
                }
            }
            transformGroup(translation: new Vector3f(3.0f, 0.0f, 0.0f)) {
                shape3D {
                    quadArray(numVertices: 4, format: GeometryArray.COORDINATES | GeometryArray.COLOR_3) {
                        vertices {
                            point(x: -1.0f, y: -1.0f, z: 0.0f)
                            point(x: 1.0f, y: -1.0f, z: 0.0f)
                            point(x: 1.0f, y: 1.0f, z: 0.0f)
                            point(x: -1.0f, y: 1.0f, z: 0.0f)
                        }
                        colors {
                            color(r: 0.5f, g: 0.5f, b: 1.0f)
                            color(r: 0.5f, g: 0.5f, b: 1.0f)
                            color(r: 0.5f, g: 0.5f, b: 1.0f)
                        }
                    }
                }
            }
        }
        viewTransformGroup(translation: new Vector3f(1.5f, 0.0f, 6.5f))
    }
Lesson 05
One major departure was the decision to not use the built-in timers to control animation. I instead used the TimingFramework to control animation and transitions. The Timing Framework is robust and provides a lot of features. It makes sense to use a consistent timing protocol throughout the project. On the other hand, this makes animation a little more difficult to specify in the builder.
Here the bit of Timing Framework code that makes the animation run:
public void timingEvent(float fraction) {
    rtri += 0.1f
    rquad -= 0.1f
    def q = j3d.transformGroup(rotX:rquad, rotZ:rquad, translation:new Vector3f(3.0f, 0.0f, -2.0f))
    def quadTrans = new Transform3D()
    q.getTransform(quadTrans)

    def triTrans = new Transform3D()
    triTrans.rotY(rtri)

    transform2.setTransform(quadTrans)
    transform.setTransform(triTrans)
}
To test this out, in addition to a Java3D installation, you will need to include the location of the platform specific library files on the java classpath. Disclaimer: WIP, things might change.